With our resident painting extraordinaire (other than Angel!) taking it upon himself to paint the Zone Mortalis board which was purchased using club funds to kickstart 30k gaming at the club and give us a unique selling point as a club to entice new gamers (fresh blood?!), and interest on his Twitter, he has kindly written up an explanatory 'how to' guide about the process. So without further ado...!
Hi Chaps @secret40kgeek here to give you a quick run down of how the clubs new zone mortalis table was painted up and the techniques employed throughout.
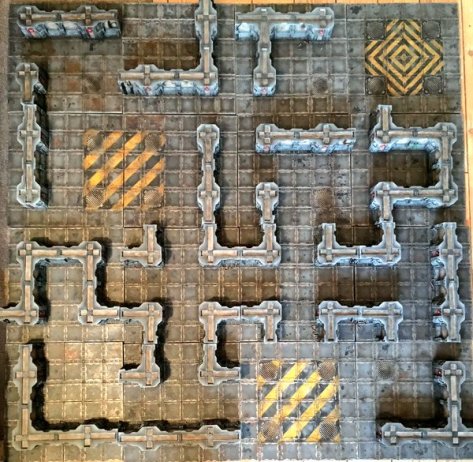
So after ordering the Forge World bundle which comprised of 16 tiles and 4 small and 2 large blast door sets I went about deciding which colour scheme i wanted to paint up. I had a look around online and on the FW website for inspiration on colour schemes etc. I decided that although I liked the beige looking FW board I wasn’t too keen on it being the inside of a space ship in the 31st millennium as it reminded me too much of 60’s/70’s interior decorating. I also liked the look of some of the darker and grey interiors as it's more in line with what I envisage a ship would look like. However, I thought that an all grey board may appear too dark when playing games so i compromised and went for a grey base with the beige walls…. and of course it wouldn’t look grim dark without lots of weathering and grime!
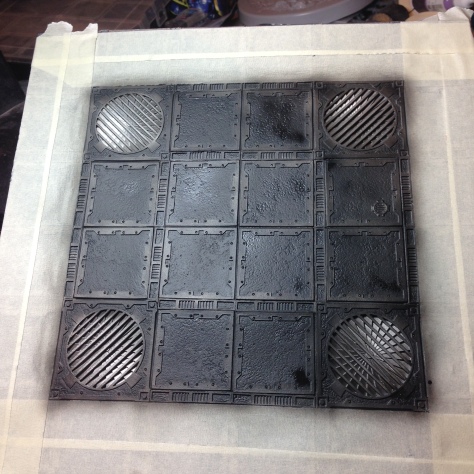
So to start off I used Halfords grey primer and at £8 a can i only needed 2 to undercoat all 16 tiles.

With the undercoat down I then airbrushed GW’s Eshin grey around the edges of each square panel to make it darker towards the outside and give some depth to each section. i then painted the bits in between by hand with Leadbelcher (tedious task) and trying not to get any on the grey panels.

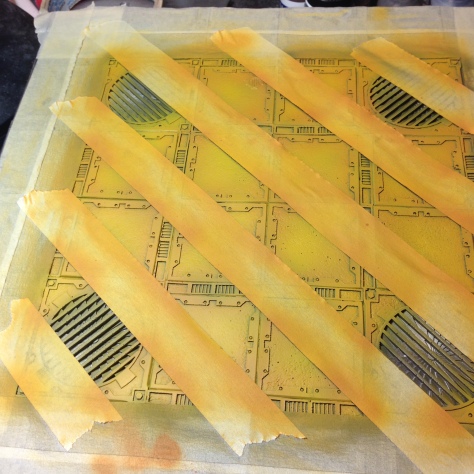
At this point I had’t completely made my mind up on on the colours for the walls so decided to make a start on the the complex tiles and because hazard stripes look cool (and because Dan insisted on hazard stripes) I decided this would be the place to do them. So I first sprayed the tiles with AK interactive heavy chipping fluid thinned down a little then I used masking tape to square off the inner section between the 4 grills and airbrushed the square black.
Once this had dried I then lined up some masking tape diagonally across the square using a second strip to measure the width before placing the next strip, which helped to keep a consistent line direction going across. It was quite simple to line up against each of the square corners.

I then airbrushed GW’s Averland Sunset as the base colour on top of the black. This was looking quite flat and wasn’t covering very well so i mixed a little Skragg brown in and airbrushed it in around the edges of the square panels wherever they met under the masking tape. This helped to give depth but was quite dark so I then went in with some Yriel Yellow to lighten it up in spots.
Then came the satisfying bit of pulling off the masking tape to see the results!!! I was lucky there was no bleeding below the tape, but also when I pulled the tape up, it pulled off some of leadbelcher and primer off the panels on the outer squares.
At first I was fuming but then I realised it looked like natural damage that would occur and added an extra level of weathering before i started with the washes and weathering powder.
The next step was to wet my toothbrush and then gently start to rub the striped sections to activate the AK chipping fluid and scratch away the yellow and black to reveal scratches worn patches. I then sponged on some additional damage and brushed on some FW ‘light earth’ weathering powder in random patches before i then airbrushed the whole tile with nuln oil and then again with agrax earthshade.
I then made up a varnish wash concoction using 1 part Nuln Oil to 1 part Agrax Earthshade to 1 part Lahmian Medium to 1 part Gloss Varnish and then generously painted this on the whole tile with a large brush. This was to protect the tiles from gaming use and give an additional layer of grime to each tile.
For the next theta tile I decided I wanted more hazard stripes because they are just really cool aren’t they?! But I didn’t want to just repeat the same pattern, so after a few attempts at different styles I settled on thinner stripes going out from a central square in diamond effect. I carried out exactly the the same steps as above to line up the masking tape and to paint and then weather the tile.

You can see below the area outside of the hazard strip area where the masking tape had pulled off the primer and Eshin Grey and Leadbelcher when it was removed. I really liked the effect so i did this on every tile to try and get weird scratched random patterns on each tile. I did then sponge over a variety of grey, black and browns to give it a dirtier appearance.
The picture below shows some weathering after using a wet toothbrush over the AK interactive heavy chipping fluid to rub away the hazard strips to give an effect of the paint wearing away over time.

For the next tile I carried out the same steps for the floor panels as above and then I airbrushed the lower sections of the walls using GW’s Abbadon Black and Eshin grey to give a dark to light effect from the bottom up of the walls.
Next I painted in the alcoves and inner tops of the walls using GW’s Rakarth Flesh with a brush carefully trying (and failing) not to get any on the grey walls. The picture below shows the first layer or so of hand painting in the Rakarth flesh. As you can see it didn't cover very well and I didn't want to lose any of the detail so I went back over it with my airbrush (again trying to minimise the spray on to the grey walls).

I then started the most tedious task of all as i went round each alcove and hand painted over any Rakarth Flesh that had got onto the walls… oh my god this was a massive tedious chore!!! Thankfully a combination of the Eye of Horus and Mysterious Universe podcasts kept me going throughout.
I then used one of the old large GW dry brushes to pick out all the detail and edges with GW’s Celestria Grey to give a scratched and damaged look to the walls. This simple technique was really effective and started to make the walls pop.

The next step was to dirty up the alcove panels and to this i simply airbrushed GW’s Agrax EarthShade into the recesses and around any pipes or damage to the walls. I then painted up all the pipes and wires etc that come from many sections of the walls and floor in a variety of GW’s Warplock Bronze, Brass Scorpion and Leadbelcher to try and mix it up and give some variety. However, I ended up doing more in Brass Scorpion as this gave most contrast.
This was the second most tedious task as some of the resin doesn’t fit snugly against the walls and there are numerous sharp and jagged edges from where it has been cast so there aren’t clean lines to paint. I got around this by painting black into the recesses and then i washed all the pipes in a mix of Agrax Earthshade and Nuln Oil. I then sparingly went round and gave slight metallic highlights to the wires etc.
The final bit for the walls was to do a black oil pin wash around everything to help add depth to the recesses and the walls after the drybrush highlight. This also added to the grimey and dirty effect and it worked so well with the amount of recesses there were it didn’t take hardly any time due to the capillary action of the oil wash.
The last 2 bits of detail I saved until the end once everything else had been painted/varnished was to paint up the numerous lights and computer screens randomly dotted around each tile.
For the lights I airbrushed on a large circle of GW’s Khorne Red surrounding the light source, followed by a slightly smaller circle of GW’s Evil Sunz Scarlet, which was followed by an even smaller circle which just covered the light and a small section around it with GW’s Wild Rider Red and then finally I did a small central area in the middle of the light with GW’s Ceramite White.

And for the computer screens I hand painted the screen itself with GW’s Caliban Green and then airbrushed around the screen with the same colour but taking care not to go as far as doing the lights. I then airbrushed into the left hand side bottom corner with GW’s Warpstone Glow and further into the corner with GW’s Moot Green. I then cut up some old Sisters of battle transfers and used the white text as fonts on the screen and secured them in place with micro set and sol. I then used ” tins of GW’s purity seal to spray all sections of the boards to seal in and protect the paint. I then went back to the computer screens and gave them a coat of gloss varnish to give additional screen shine.
So all in all it has taken me 2 months to complete all 16 tiles and the doors, although i’m going to go back and add some hazard effects to some of the doors to mix things up a bit. The last 8 tiles only took me 2 weeks as i got into my stride and managed to get a consistent effect for each tile using the same steps over and over again.
I would be lying if I said it was an enjoyable painting project. However, it was extremely satisfying to finish and it makes for a great centre piece at the club and opens up a new style of gaming.
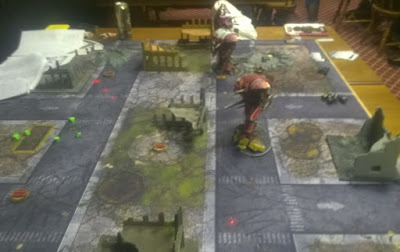
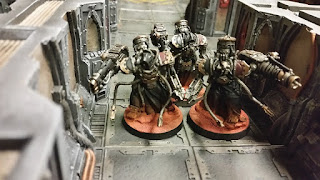
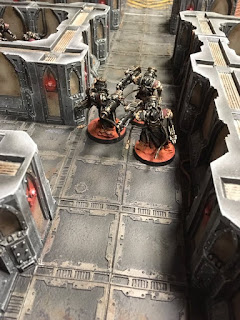
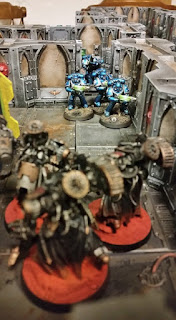
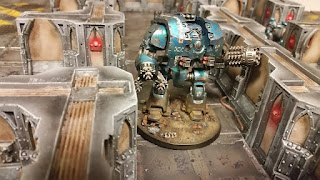
Me and Paul christened the board with a game of 30K Alpha Legion Vs Mechanicum and it was awesome (even though we kept forgetting some of the rules as we went along) but here’s to many more fun games… although we might have to buy 8 more tiles to make it a 6×4 !!!


Hi Chaps @secret40kgeek here to give you a quick run down of how the clubs new zone mortalis table was painted up and the techniques employed throughout.
So after ordering the Forge World bundle which comprised of 16 tiles and 4 small and 2 large blast door sets I went about deciding which colour scheme i wanted to paint up. I had a look around online and on the FW website for inspiration on colour schemes etc. I decided that although I liked the beige looking FW board I wasn’t too keen on it being the inside of a space ship in the 31st millennium as it reminded me too much of 60’s/70’s interior decorating. I also liked the look of some of the darker and grey interiors as it's more in line with what I envisage a ship would look like. However, I thought that an all grey board may appear too dark when playing games so i compromised and went for a grey base with the beige walls…. and of course it wouldn’t look grim dark without lots of weathering and grime!
So to start off I used Halfords grey primer and at £8 a can i only needed 2 to undercoat all 16 tiles.
With the undercoat down I then airbrushed GW’s Eshin grey around the edges of each square panel to make it darker towards the outside and give some depth to each section. i then painted the bits in between by hand with Leadbelcher (tedious task) and trying not to get any on the grey panels.
At this point I had’t completely made my mind up on on the colours for the walls so decided to make a start on the the complex tiles and because hazard stripes look cool (and because Dan insisted on hazard stripes) I decided this would be the place to do them. So I first sprayed the tiles with AK interactive heavy chipping fluid thinned down a little then I used masking tape to square off the inner section between the 4 grills and airbrushed the square black.
Once this had dried I then lined up some masking tape diagonally across the square using a second strip to measure the width before placing the next strip, which helped to keep a consistent line direction going across. It was quite simple to line up against each of the square corners.
I then airbrushed GW’s Averland Sunset as the base colour on top of the black. This was looking quite flat and wasn’t covering very well so i mixed a little Skragg brown in and airbrushed it in around the edges of the square panels wherever they met under the masking tape. This helped to give depth but was quite dark so I then went in with some Yriel Yellow to lighten it up in spots.
Then came the satisfying bit of pulling off the masking tape to see the results!!! I was lucky there was no bleeding below the tape, but also when I pulled the tape up, it pulled off some of leadbelcher and primer off the panels on the outer squares.
At first I was fuming but then I realised it looked like natural damage that would occur and added an extra level of weathering before i started with the washes and weathering powder.
The next step was to wet my toothbrush and then gently start to rub the striped sections to activate the AK chipping fluid and scratch away the yellow and black to reveal scratches worn patches. I then sponged on some additional damage and brushed on some FW ‘light earth’ weathering powder in random patches before i then airbrushed the whole tile with nuln oil and then again with agrax earthshade.
I then made up a varnish wash concoction using 1 part Nuln Oil to 1 part Agrax Earthshade to 1 part Lahmian Medium to 1 part Gloss Varnish and then generously painted this on the whole tile with a large brush. This was to protect the tiles from gaming use and give an additional layer of grime to each tile.
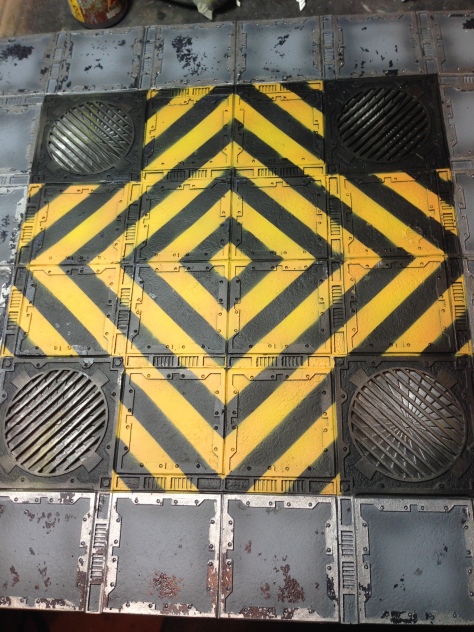
For the next theta tile I decided I wanted more hazard stripes because they are just really cool aren’t they?! But I didn’t want to just repeat the same pattern, so after a few attempts at different styles I settled on thinner stripes going out from a central square in diamond effect. I carried out exactly the the same steps as above to line up the masking tape and to paint and then weather the tile.
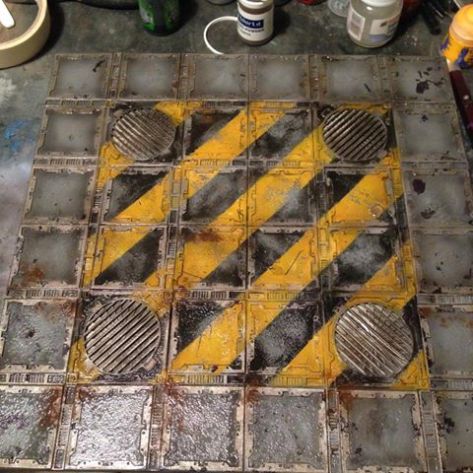
You can see below the area outside of the hazard strip area where the masking tape had pulled off the primer and Eshin Grey and Leadbelcher when it was removed. I really liked the effect so i did this on every tile to try and get weird scratched random patterns on each tile. I did then sponge over a variety of grey, black and browns to give it a dirtier appearance.
The picture below shows some weathering after using a wet toothbrush over the AK interactive heavy chipping fluid to rub away the hazard strips to give an effect of the paint wearing away over time.
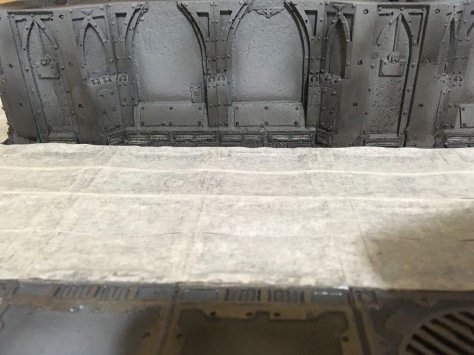
For the next tile I carried out the same steps for the floor panels as above and then I airbrushed the lower sections of the walls using GW’s Abbadon Black and Eshin grey to give a dark to light effect from the bottom up of the walls.
Next I painted in the alcoves and inner tops of the walls using GW’s Rakarth Flesh with a brush carefully trying (and failing) not to get any on the grey walls. The picture below shows the first layer or so of hand painting in the Rakarth flesh. As you can see it didn't cover very well and I didn't want to lose any of the detail so I went back over it with my airbrush (again trying to minimise the spray on to the grey walls).
I then started the most tedious task of all as i went round each alcove and hand painted over any Rakarth Flesh that had got onto the walls… oh my god this was a massive tedious chore!!! Thankfully a combination of the Eye of Horus and Mysterious Universe podcasts kept me going throughout.
I then used one of the old large GW dry brushes to pick out all the detail and edges with GW’s Celestria Grey to give a scratched and damaged look to the walls. This simple technique was really effective and started to make the walls pop.
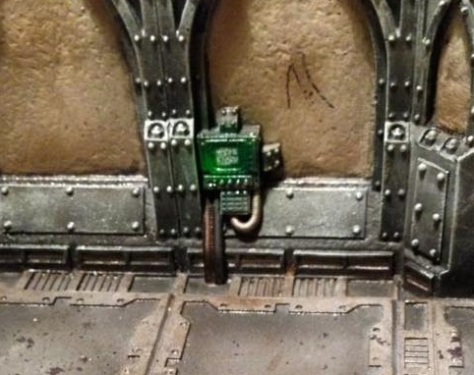
The next step was to dirty up the alcove panels and to this i simply airbrushed GW’s Agrax EarthShade into the recesses and around any pipes or damage to the walls. I then painted up all the pipes and wires etc that come from many sections of the walls and floor in a variety of GW’s Warplock Bronze, Brass Scorpion and Leadbelcher to try and mix it up and give some variety. However, I ended up doing more in Brass Scorpion as this gave most contrast.
This was the second most tedious task as some of the resin doesn’t fit snugly against the walls and there are numerous sharp and jagged edges from where it has been cast so there aren’t clean lines to paint. I got around this by painting black into the recesses and then i washed all the pipes in a mix of Agrax Earthshade and Nuln Oil. I then sparingly went round and gave slight metallic highlights to the wires etc.
The final bit for the walls was to do a black oil pin wash around everything to help add depth to the recesses and the walls after the drybrush highlight. This also added to the grimey and dirty effect and it worked so well with the amount of recesses there were it didn’t take hardly any time due to the capillary action of the oil wash.
The last 2 bits of detail I saved until the end once everything else had been painted/varnished was to paint up the numerous lights and computer screens randomly dotted around each tile.
For the lights I airbrushed on a large circle of GW’s Khorne Red surrounding the light source, followed by a slightly smaller circle of GW’s Evil Sunz Scarlet, which was followed by an even smaller circle which just covered the light and a small section around it with GW’s Wild Rider Red and then finally I did a small central area in the middle of the light with GW’s Ceramite White.
And for the computer screens I hand painted the screen itself with GW’s Caliban Green and then airbrushed around the screen with the same colour but taking care not to go as far as doing the lights. I then airbrushed into the left hand side bottom corner with GW’s Warpstone Glow and further into the corner with GW’s Moot Green. I then cut up some old Sisters of battle transfers and used the white text as fonts on the screen and secured them in place with micro set and sol. I then used ” tins of GW’s purity seal to spray all sections of the boards to seal in and protect the paint. I then went back to the computer screens and gave them a coat of gloss varnish to give additional screen shine.
So all in all it has taken me 2 months to complete all 16 tiles and the doors, although i’m going to go back and add some hazard effects to some of the doors to mix things up a bit. The last 8 tiles only took me 2 weeks as i got into my stride and managed to get a consistent effect for each tile using the same steps over and over again.
I would be lying if I said it was an enjoyable painting project. However, it was extremely satisfying to finish and it makes for a great centre piece at the club and opens up a new style of gaming.
Me and Paul christened the board with a game of 30K Alpha Legion Vs Mechanicum and it was awesome (even though we kept forgetting some of the rules as we went along) but here’s to many more fun games… although we might have to buy 8 more tiles to make it a 6×4 !!!